
Panning is one of those techniques we often ignore, but can lend awesome creative input to your images and create a point of focus for the viewer. While you are not actually going to have a nugget of gold in your pan like the old western gold seekers, you’ll have a result that is equally as rewarding. Panning is a great photography skill to practice for those instances when you must use it to get the shot.

The basic idea behind panning is to achieve a sharp subject while blurring the background. This lends itself to the composition of your photography by concentrating the focus on the subject; think of it as rendering a resultant image similar to the use of DOF, but different in execution.

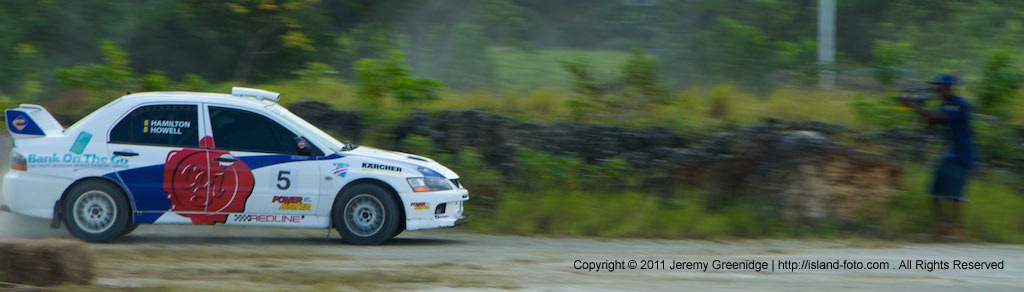
If you can imagine shooting a moving train on a platform, the platform is in focus while the train is blurred. This is the opposite to panning. In panning, your subject is in focus and the background is blurred. To pan, you move your camera in such a manner that you keep the subject on a parallel plane and also so that a point on the subject maintains the same location in your viewfinder for the duration of the exposure. We have all seen those images of accidentally blurred objects, however, this time we are going to attempt to keep the moving objects in focus while blurring the stationery ones.
Here are a couple reasons to pan:

Panning creates/highlights the element of speed. Shooting an event, such as a race of any sort or kids playing, loses effectiveness if every single element in the shot is frozen in time. It is similar to shooting a propeller-driven aircraft flying and the propellers are frozen as a pristinely sharp static object. It leaves one to wonder how the aircraft is flying if the propellers aren’t turning.
Panning adds clarity and mystery to a shot. Much like DOF does with the background being blurred, panning achieves the same effect by bringing the image to the foreground and creates an element of mystery at the same time.

Here are the steps to create a panned image:
Use a slow shutter speed: 1/30s, 1/60s or 1/90s, depending on the focal length of your lens and your subjects speed. Â As your level of skill with this technique increases you’ll find that you can lower your shutter speed and still get a sharp subject and a blurred background.
Lens choices: The best lens to use is one that allows adequate focal length for you to get sufficient detail in your image while also allowing you to execute the panning movement at a moderate pace. The caveat here is that the longer your lens, the easier it is to pan, but you risk losing detail. A rule of thumb is use a longer focal lengths as the speed of subject along the parallel plane increases. For events like motorsports, I suggest a focal length between 70-100mm – this will give you sufficient distance to pan effectively.

Continuous focus: Select the continuous focus option on your camera so that the camera manages the focusing. Keep in mind that depending on your camera, the center cross focus point is often the most accurate, but in panning, you likely want to select a point to the right or left depending on the direction of your subject. If your subject is ‘moving’, you’ll want to give them somewhere to go in the image and not run off the edge of the frame.

Auto focus modes: Depending on the capabilities of your camera, you may be able to select a mode that makes more than one focus point active. Dynamic area autofocus is your best choice to use in this circumstance.

Metering: Matrix metering is your best choice for use so that you achieve a balanced exposure for the entire frame in most circumstances. However, if your subject is dark and your viewfinder contains a significant amount of sky or other bright areas, you are best off with spot or center-weighted metering.
Shutter Priority: This is your best selection to capture motion, as panning depends on slower shutter speeds. Set your camera to shoot at a specific shutter sped and let camera adjust your aperture to keep within exposure norms, but most importantly keep your ISO high enough to achieve a sufficient F-stop to keep the entire subject in focus if that is what you desire.

Body Stance and rotation: Plant your feet angled towards the start of the area that you want to begin your pan. If your pan means you have to turn your torso to the left, you’ll want to have your right foot in front pointing at the subject as it enters your panning area and vice versa if the subject enters your panning area from the left. As the subject comes into view, rotate your torso like you do with a golf swing – notice how Tiger’s feet stay in place except for the pivot at the end of the swing in this clip. Rotate your torso at a constant speed to match the subject in order to keep the subject at the same point in your viewfinder and follow through with the rotation even after you have released the shutter actuator to avoid jerky movements.

By following the steps above you should be able to achieve an effective pan. For some practice try shooting any moving object and then share links to your images with us in the comment section below.
Happy panning!


Really informative blog post.Really thank you! Really Great.